In this picture you can see where I started removing the rust in the upper right corner.
But as I did, pop rivets began to show up through the rust. And there were areas of body filler. Something was going on here.
As it turns out, the entire central main section of the trunk floor had been patched with a giant repair panel pop riveted into place. There were also two smaller sections, one on each side. The trunk had been full of junk when the car arrived. I had been using as temporary storage as I removed small parts. So I didn't notice the large patch until I really started working on it.
The owner and I agreed that to do the job right, a new floor needed to be installed. And it would be a lot easier to do it before the right quarter panel was installed. Had we known, it would have been even easier to do it before the left quarter panel was on. It took awhile and was a nasty job, but with a lot of patience and air chisling I took it down to the frame rails.
Here it is from an angle.
This is also a good view of the trunk floor extension that had to be fabricated. Here it has been painted with a coat of self etching primer.Here is a close up view of the right frame rail.
You can see the rear axle and the leaf spring, along with the coil over shock.
The area just below the right tail light was rusted pretty badly too.
The entire piece of metal between the two frame rails was rusted completely through in places. Some of the holes were in places where they just couldn't be welded up.
In the picture above the piece of metal coming from the left side with what looks similar to two stair steps is what supports, not only the trunk, but also the gas tank. This is also what the rear bumper bolts to. This would need more than just a patch panel made from the old quarter panel.
I went to a local fabrication shop with detailed measurements I had taken.
For just a little over a hundred bucks, they made me a new piece to go over the old one.
I had to bend the bottom edge up. It is darkened there because I heated it up first.
After patching the area beneath the right tail light, I was ready to start nailing down the trunk floor.
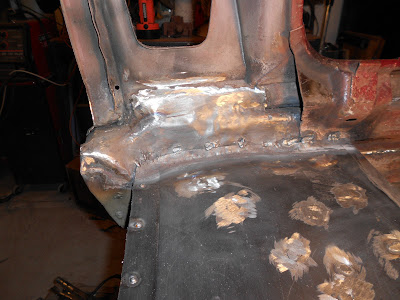
Here is the same area as above, but with the welds ground down and a section of the new trunk floor welded in.
Here is another view of the right section of the trunk floor. The shiny spots are where I ground down the welds.
Here is the view of the left side.
This brings me almost up to date with where I am on the car as of Jan 1, 2013. I will be welding in the center section of the trunk floor soon. But first there is a LOT of sealing and priming to be done.
Happy New Year!
To view the next page, click here .


No comments:
Post a Comment